Before Docker: Dependency hell.
App works on your laptop. Doesn’t work on production. Different OS versions. Different libraries. Different configurations.
After Docker: “It works on my machine” = It works everywhere.
This guide teaches Docker and Docker Compose practically:
- Container fundamentals
- Real Dockerfiles
- Docker Compose for multi-container apps
- Microservices architecture
- Real production examples
- Best practices
Not theory. Just hands-on containerization you can use today.
Part 1: Understanding Docker Fundamentals
What Is Docker?
Docker is containerization platform.
Container = Your application + all dependencies in one box.
Traditional approach:
Server 1: Windows + Python 3.8 + Node.js 12 + PostgreSQL 10
Server 2: Linux + Python 3.9 + Node.js 14 + PostgreSQL 12
Different = Problems

Docker approach:
Container 1: App + Python 3.8 + dependencies (exact)
Container 2: App + Python 3.9 + dependencies (exact)
Same = Works everywhere
Why Docker matters:
Before Docker:
- 30 minutes: Install dependencies
- 2 hours: Fix compatibility issues
- Different behavior in dev/test/production

After Docker:
- 5 minutes: Pull Docker image
- Same behavior everywhere
- Development = Production environment
Reference: What Is Docker
Docker Architecture
Docker Client (docker command)
    ↓
Docker Daemon (runs on your computer)
    ↓
Containers (isolated applications)
    ↓
Images (blueprints for containers)
Key concepts:
Image: Blueprint (like class in programming) Container: Running instance of image (like object) Registry: Storage for images (like Docker Hub)
Part 2: Installing and Setting Up Docker
Step 1: Install Docker
Windows/Mac:
- Download Docker Desktop
- Install
- Start Docker Desktop
- Open terminal/PowerShell
- Type:
docker --version
Linux:
curl -fsSL https://get.docker.com -o get-docker.sh
sudo sh get-docker.sh
sudo usermod -aG docker $USER
docker --version
Time: 15-20 minutes
Reference: Install Docker
Step 2: Pull Your First Docker Image
# Pull official Node.js image
docker pull node:18

# Run container
docker run -it node:18

# You're now inside container with Node.js
node --version  # v18.x.x
Time: 5 minutes
Part 3: Creating Your First Dockerfile
Understanding Dockerfile
Dockerfile = Recipe for Docker image.
Each line creates a layer in the image.
Simple example:
# Start from official Node.js image
FROM node:18-alpine

# Set working directory inside container
WORKDIR /app

# Copy package files
COPY package*.json ./

# Install dependencies
RUN npm install

# Copy application code
COPY . .

# Expose port
EXPOSE 3000

# Start application
CMD ["npm", "start"]
What each command does:
FROM: Base image (start point)
WORKDIR: Where commands run
COPY: Copy files from host to container
RUN: Execute commands (npm install, etc)
EXPOSE: Document which port app uses
CMD: Default command when container starts
Step 4: Build Your Image
Create Dockerfile and package.json in directory:
package.json:
{
  "name": "my-app",
  "version": "1.0.0",
  "scripts": {
    "start": "node server.js"
  },
  "dependencies": {
    "express": "^4.18.0"
  }
}
server.js:
const express = require('express');
const app = express();

app.get('/', (req, res) => {
  res.send('Hello from Docker!');
});

app.listen(3000, () => {
  console.log('Server running on port 3000');
});
Build image:
docker build -t my-app:1.0 .

# Run container
docker run -p 3000:3000 my-app:1.0

# Visit http://localhost:3000
Time: 10 minutes
Reference: Dockerfile Reference
Part 4: Docker Compose Fundamentals
What Is Docker Compose?
Docker Compose = Tool for multi-container applications.
Instead of running docker run 5 times for 5 different containers:
# One docker-compose.yml file defines everything
version: '3.8'

services:
  web:
    build: .
  database:
    image: postgres:15
  cache:
    image: redis:7
Run everything:
docker-compose upAll 3 containers start together. Connected automatically.
Step 5: Create docker-compose.yml
Simple example:
version: '3.8'

services:
  # Web application
  web:
    build: .
    ports:
      - "3000:3000"
    environment:
      - DATABASE_URL=postgresql://user:password@db:5432/myapp
    depends_on:
      - db

  # PostgreSQL database
  db:
    image: postgres:15
    environment:
      - POSTGRES_USER=user
      - POSTGRES_PASSWORD=password
      - POSTGRES_DB=myapp
    volumes:
      - db-data:/var/lib/postgresql/data

  # Redis cache
  cache:
    image: redis:7
    ports:
      - "6379:6379"

volumes:
  db-data:
What this does:
web service:
- Builds image from Dockerfile in current directory
- Maps port 3000 to host
- Sets environment variables
- Waits for db to start before starting

db service:
- Uses official PostgreSQL image
- Sets database credentials
- Stores data in persistent volume

cache service:
- Uses official Redis image
- Exposes port for web app to access
Step 6: Run Docker Compose
# Start all services
docker-compose up

# In another terminal, check services
docker-compose ps

# View logs
docker-compose logs -f web

# Stop all services
docker-compose down

# Remove everything including volumes
docker-compose down -v
Time: 5 minutes
Reference: Docker Compose Documentation
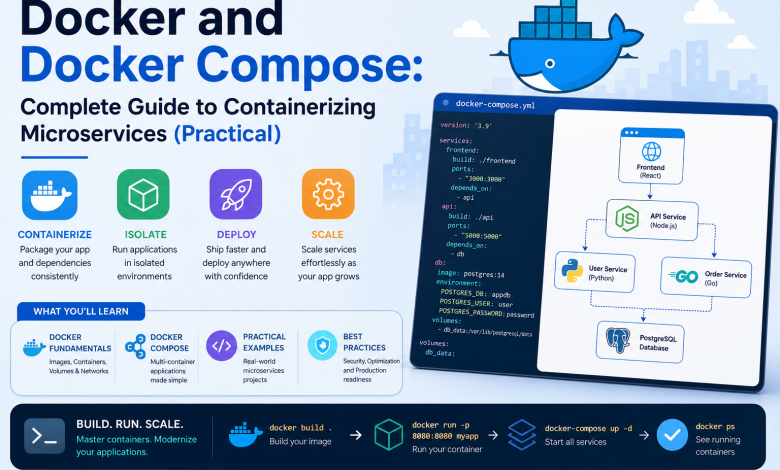
Part 5: Containerizing Microservices Applications
Understanding Microservices Architecture
Microservices = Multiple small services working together.
Traditional monolith:
One big application
- User Service
- Product Service
- Order Service
- Payment Service
All in one app = Hard to scale

Microservices:
Each service separate
- User Service (Docker container)
- Product Service (Docker container)
- Order Service (Docker container)
- Payment Service (Docker container)
Each scales independently
Real Microservices Example: E-Commerce Application
Architecture:
User Service (Python Flask)
    ↓
API Gateway (Node.js)
    ↓
├─ Product Service (Python FastAPI)
├─ Order Service (Node.js)
├─ Payment Service (Java Spring Boot)
└─ Notification Service (Python)

Database: PostgreSQL
Cache: Redis
Message Queue: RabbitMQ
Step 7: Create Microservices Dockerfiles
1. User Service (Python):
Create user-service/Dockerfile:
FROM python:3.11-slim

WORKDIR /app

COPY requirements.txt .
RUN pip install -r requirements.txt

COPY . .

EXPOSE 5000

CMD ["python", "app.py"]
user-service/requirements.txt:
Flask==2.3.0
Flask-SQLAlchemy==3.0.0
python-dotenv==1.0.0
user-service/app.py:
from flask import Flask
from flask_sqlalchemy import SQLAlchemy

app = Flask(__name__)
app.config['SQLALCHEMY_DATABASE_URI'] = 'postgresql://user:pass@db:5432/users'
db = SQLAlchemy(app)

@app.route('/users', methods=['GET'])
def get_users():
    return {'users': []}

@app.route('/health', methods=['GET'])
def health():
    return {'status': 'healthy'}

if __name__ == '__main__':
    app.run(host='0.0.0.0', port=5000)
2. Product Service (Python):
Create product-service/Dockerfile:
FROM python:3.11-slim

WORKDIR /app

COPY requirements.txt .
RUN pip install -r requirements.txt

COPY . .

EXPOSE 5001

CMD ["uvicorn", "main:app", "--host", "0.0.0.0", "--port", "5001"]
product-service/main.py:
from fastapi import FastAPI
import httpx

app = FastAPI()

@app.get("/products")
async def get_products():
    return {"products": []}

@app.get("/health")
async def health():
    return {"status": "healthy"}
3. Order Service (Node.js):
Create order-service/Dockerfile:
FROM node:18-alpine

WORKDIR /app

COPY package*.json ./
RUN npm install

COPY . .

EXPOSE 5002

CMD ["npm", "start"]
order-service/server.js:
const express = require('express');
const app = express();

app.get('/orders', (req, res) => {
  res.json({ orders: [] });
});

app.get('/health', (req, res) => {
  res.json({ status: 'healthy' });
});

app.listen(5002, () => {
  console.log('Order Service on port 5002');
});
Step 8: Docker Compose for Complete Microservices
Create docker-compose.yml:
version: '3.8'

services:
  # User Service
  user-service:
    build: ./user-service
    ports:
      - "5000:5000"
    environment:
      - DATABASE_URL=postgresql://user:password@db:5432/users
      - FLASK_ENV=production
    depends_on:
      - db
    networks:
      - microservices-network

  # Product Service
  product-service:
    build: ./product-service
    ports:
      - "5001:5001"
    environment:
      - DATABASE_URL=postgresql://user:password@db:5432/products
    depends_on:
      - db
    networks:
      - microservices-network

  # Order Service
  order-service:
    build: ./order-service
    ports:
      - "5002:5002"
    environment:
      - USER_SERVICE_URL=http://user-service:5000
      - PRODUCT_SERVICE_URL=http://product-service:5001
    depends_on:
      - db
    networks:
      - microservices-network

  # API Gateway
  api-gateway:
    image: nginx:alpine
    ports:
      - "8000:80"
    volumes:
      - ./nginx.conf:/etc/nginx/nginx.conf:ro
    depends_on:
      - user-service
      - product-service
      - order-service
    networks:
      - microservices-network

  # PostgreSQL Database
  db:
    image: postgres:15
    environment:
      - POSTGRES_USER=user
      - POSTGRES_PASSWORD=password
      - POSTGRES_INITDB_ARGS=--encoding=UTF8
    volumes:
      - postgres-data:/var/lib/postgresql/data
    networks:
      - microservices-network

  # Redis Cache
  cache:
    image: redis:7-alpine
    ports:
      - "6379:6379"
    networks:
      - microservices-network

  # RabbitMQ Message Queue
  rabbitmq:
    image: rabbitmq:3.12-management-alpine
    ports:
      - "5672:5672"
      - "15672:15672"
    environment:
      - RABBITMQ_DEFAULT_USER=user
      - RABBITMQ_DEFAULT_PASS=password
    networks:
      - microservices-network

volumes:
  postgres-data:

networks:
  microservices-network:
    driver: bridge
Deploy everything:
docker-compose up -d

# Check all services running
docker-compose ps

# View logs
docker-compose logs -f

# Stop everything
docker-compose down
Time: 10-15 minutes
Read also:
How to Build a Complete CI/CD Pipeline with GitHub Actions and Docker (2026 Guide)
Part 6: Best Practices for Docker and Microservices
1. Use Multi-Stage Builds (Smaller Images)
Bad (large image):
FROM golang:1.20
WORKDIR /app
COPY . .
RUN go build -o app
CMD ["./app"]
Good (small image):
# Build stage
FROM golang:1.20 AS builder
WORKDIR /app
COPY . .
RUN go build -o app
# Runtime stage (smaller)
FROM alpine:latest
COPY /app/app .
CMD ["./app"]Benefit: Final image is 50-70% smaller.
Reference: Multi-Stage Builds
2. Use Minimal Base Images
FROM ubuntu:22.04        # 77 MB
FROM python:3.11         # 1+ GB
FROM python:3.11-slim    # 125 MB  ✓ Use this
FROM python:3.11-alpine  # 50 MB   ✓ Or this
Alpine images are 10-20x smaller.
3. Don’t Run as Root
# Bad: runs as root
FROM node:18
WORKDIR /app
COPY . .
CMD ["npm", "start"]

# Good: runs as non-root user
FROM node:18
RUN useradd -m appuser
USER appuser
WORKDIR /app
COPY . .
CMD ["npm", "start"]
4. Health Checks
services:
  web:
    build: .
    healthcheck:
      test: ["CMD", "curl", "-f", "http://localhost:3000/health"]
      interval: 30s
      timeout: 10s
      retries: 3
      start_period: 40s
Docker automatically removes unhealthy containers.
5. Logging Strategy
# Don't write logs to files
# Write to stdout for Docker to capture

# Wrong:
RUN echo "Application started" >> app.log

# Right:
RUN echo "Application started"  # Goes to stdout
View logs:
docker logs container-name
docker-compose logs service-name
Part 7: Container Registry (Docker Hub)
Publishing Your Images
# Login to Docker Hub
docker login

# Tag image
docker tag my-app:1.0 username/my-app:1.0

# Push to registry
docker push username/my-app:1.0

# Others can now pull
docker pull username/my-app:1.0
Reference: Docker Hub
Part 8: Production Considerations
Networking
services:
  web:
    networks:
      - public
      - internal

  db:
    networks:
      - internal

networks:
  public:
    driver: bridge
  internal:
    driver: bridge
web talks to public and internal networks. db talks only to internal network (not exposed).
Volumes for Persistence
services:
  db:
    image: postgres:15
    volumes:
      - db-data:/var/lib/postgresql/data

volumes:
  db-data:
    driver: local
Data persists even if container stops.
Environment Secrets
.env file:
DB_PASSWORD=super_secret_password
API_KEY=abc123def456
docker-compose.yml:
services:
  app:
    environment:
      - DB_PASSWORD=${DB_PASSWORD}
      - API_KEY=${API_KEY}
Never commit .env to git!
Part 9: Troubleshooting Docker and Compose
Issue 1: Container Won’t Start
# Check logs
docker logs container-name

# Run in interactive mode to see errors
docker run -it image-name

# Check image exists
docker images
Issue 2: Port Already in Use
# Find what's using port
netstat -an | grep 3000  # Linux/Mac
netstat -ano | findstr :3000  # Windows

# Change port in docker-compose
ports:
  - "3001:3000"  # Use 3001 instead
Issue 3: Services Can’t Communicate
# Check network
docker network ls

# Inspect network
docker network inspect network-name

# Services must use service name as hostname
# Wrong: http://localhost:5000
# Right: http://user-service:5000
Part 10: Docker vs Docker Compose vs Kubernetes
Docker:
- Single container
- Simple applications
- Development

Docker Compose:
- Multiple containers
- Multi-service applications
- Development and small production

Kubernetes:
- Large-scale orchestration
- Auto-scaling
- High availability
- Enterprise production

Reference: [Kubernetes vs Docker Compose](https://kubernetes.io/docs/concepts/architecture/)
Conclusion: Containerization Is Standard
Docker and Docker Compose aren’t optional anymore.
They’re standard practice for:
- Development (consistent environment)
- Testing (same as production)
- Production (reliable deployment)
- Microservices (service isolation)
Start with Docker. Learn Docker Compose. Scale to Kubernetes when needed.